

SIGNALING TECHNIQUES
One of your first concerns when you find yourself in a survival situation is to communicate with your friends or allies. Generally, communication is the giving and receiving of information. As a survivor, you must get your rescuer's attention first, and second, send a message your rescuer understands. Some attention-getters are man-made geometric patterns such as straight lines, circles, triangles, or X's displayed in uninhabited areas; a large fire or flash of light; a large, bright object moving slowly; or contrast, whether from color or shadows. The type of signal used will depend on your environment and the enemy situation.
APPLICATION
If in a noncombat situation, you need to find the largest available clear and flat area on the highest possible terrain. Use as obvious a signal as you can create. On the other hand, you will have to be more discreet in combat situations. You do not want to signal and attract the enemy. Pick an area that is visible from the air, but ensure there are hiding places nearby. Try to have a hill or other object between the signal site and the enemy to mask your signal from the enemy. Perform a thorough reconnaissance of the area to ensure there are no enemy forces nearby.Whatever signaling technique or device you plan to use, know how to use it and be ready to put it into operation on short notice. If possible, avoid using signals or signaling techniques that can physically endanger you. Keep in mind that signals to your friends may alert the enemy of your presence and location. Before signaling, carefully weigh your rescue chances by friends against the danger of capture by the enemy.
A radio is probably the surest and quickest way to let others know where you are and to let you receive their messages. Become familiar with the radios in your unit. Learn how to operate them and how to send and receive messages.
You will find descriptions of other signaling techniques, devices, and articles you can use. Learn how to use them. Think of ways in which you can adapt or change them for different environments. Practice using these signaling techniques, devices, and articles before you need them. Planned, prearranged signaling techniques may improve your chance of rescue.
MEANS FOR SIGNALING
There are two main ways to get attention or to communicate--visual and audio. The means you use will depend on your situation and the material you have available. Whatever the means, always have visual and audio signals ready for use.Visual Signals
These signals are materials or equipment you use to make your presence known to rescuers.Fire During darkness, fire is the most effective visual means for signaling. Build three fires in a triangle (the international distress signal) or in a straight line with about 25 meters between the fires. Build them as soon as time and the situation permit and protect them until you need them. If you are alone, maintaining three fires may be difficult. If so, maintain one signal fire.
When constructing signal fires, consider your geographic location. If in a jungle, find a natural clearing or the edge of a stream where you can build fires that the jungle foliage will not hide. You may even have to clear an area. If in a snow-covered area, you may have to clear the ground of snow or make a platform on which to build the fire so that melting snow will not extinguish it.
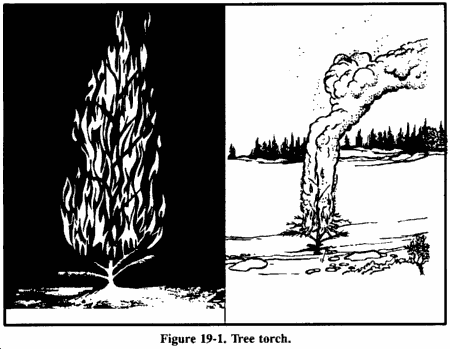
A burning tree (tree torch) is another way to attract attention (Figure 19-1). You can set pitch-bearing trees afire, even when green. You can get other types of trees to burn by placing dry wood in the lower branches and igniting it so that the flames flare up and ignite the foliage. Before the primary tree is consumed, cut and add more small green trees to the fire to produce more smoke. Always select an isolated tree so that you do not start a forest fire and endanger yourself.
Smoke
During daylight, build a smoke generator and use smoke to gain attention (Figure 19-2). The international distress signal is three columns of smoke. Try to create a color of smoke that contrasts with the background; dark smoke against a light background and vice versa. If you practically smother a large fire with green leaves, moss, or a little water, the fire will produce white smoke. If you add rubber or oil-soaked rags to a fire, you will get black smoke.

In a desert environment, smoke hangs close to the ground, but a pilot can spot it in open desert terrain. Smoke signals are effective only on comparatively calm, clear days. High winds, rain, or snow disperse smoke, lessening its chances of being seen.
Smoke Grenades
If you have smoke grenades with you, use them in the same pattern as described for fires. Keep them dry so that they will work when you need them. Take care not to ignite the vegetation in the area when you use them.
Pen Flares
These flares are part of an aviator's survival vest. The device consists of a pen-shaped gun with a flare attached by a nylon cord. When fired, the pen flare sounds like a pistol shot and fires the flare about 150 meters high. It is about 3 centimeters in diameter.
To have the pen flare ready for immediate use, take it out of its wrapper, attach the flare, leave the gun uncocked, and wear it on a cord or chain around your neck. Be ready to fire it in front of search aircraft and be ready with a secondary signal. Also, be ready to take cover in case the pilot mistakes the flare for enemy fire.
Tracer Ammunition
You may use rifle or pistol tracer ammunition to signal search aircraft. Do not fire the ammunition in front of the aircraft. As with pen flares, be ready to take cover if the pilot mistakes your tracers for enemy fire.
Star Clusters
Red is the international distress color; therefore, use a red star cluster whenever possible. Any color, however, will let your rescuers know where you are. Star clusters reach a height of 200 to 215 meters, burn an average of 6 to 10 seconds, and descend at a rate of 14 meters per second.
Star Parachute Flares
These flares reach a height of 200 to 215 meters and descend at a rate of 2.1 meters per second. The M126 (red) burns about 50 seconds and the M127 (white) about 25 seconds. At night you can see these flares at 48 to 56 kilometers.
Mirrors or Shiny Objects
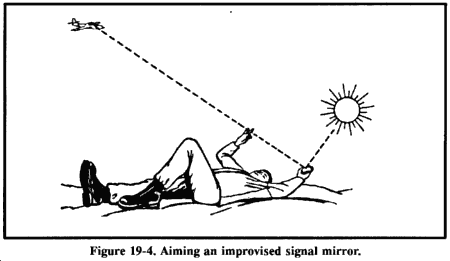
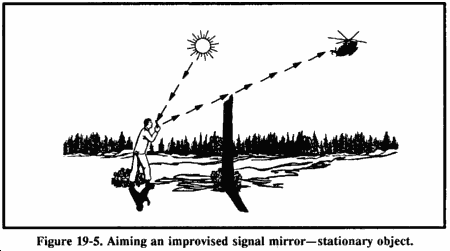
On a sunny day, a mirror is your best signaling device. If you don't have a mirror, polish your canteen cup, your belt buckle, or a similar object that will reflect the sun's rays. Direct the flashes in one area so that they are secure from enemy observation. Practice using a mirror or shiny object for signaling now; do not wait until you need it. If you have an MK-3 signal mirror, follow the instructions on its back (Figure 19-3).

Wear the signal mirror on a cord or chain around your neck so that it is ready for immediate use. However, be sure the glass side is against your body so that it will not flash; the enemy can see the flash.
CAUTION
Do not flash a signal mirror rapidly because a pilot may mistake the flashes for enemy fire. Do not direct the beam in the aircraft's cockpit for more than a few seconds as it may blind the pilot. |
Haze, ground fog, and mirages may make it hard for a pilot to spot signals from a flashing object. So, if possible, get to the highest point in your area when signaling. If you can't determine the aircraft's location, flash your signal in the direction of the aircraft noise.
Note: Pilots have reported seeing mirror flashes up to 160 kilometers away under ideal conditions.Figures 19-4 and 19-5 show methods of aiming a signal mirror for signaling.
Flashlight or Strobe Light
At night you can use a flashlight or a strobe light to send an SOS to an aircraft. When using a strobe light, take care to prevent the pilot from mistaking it for incoming ground fire. The strobe light flashes 60 times per minute. Some strobe lights have infrared covers and lenses. Blue flash collimators are also available for strobe lights.
VS-17 Panel
During daylight you can use a VS-17 panel to signal. Place the orange side up as it is easier to see from the air than the violet side. Flashing the panel will make it easier for the aircrew to spot. You can use any bright orange or violet cloth as a substitute for the VS-17.
Clothing
Spreading clothing on the ground or in the top of a tree is another way to signal. Select articles whose color will contrast with the natural surroundings. Arrange them in a large geometric pattern to make them more likely to attract attention.
Natural Material
If you lack other means, you can use natural materials to form a symbol or message that can be seen from the air. Build mounds that cast shadows; you can use brush, foliage of any type, rocks, or snow blocks.
In snow-covered areas, tramp the snow to form letters or symbols and fill the depression with contrasting material (twigs or branches). In sand, use boulders, vegetation, or seaweed to form a symbol or message. In brush-covered areas, cut out patterns in the vegetation or sear the ground. In tundra, dig trenches or turn the sod upside down.
In any terrain, use contrasting materials that will make the symbols visible to the aircrews.
Sea Dye Markers
All Army aircraft involved in operations near or over water will normally carry a water survival kit that contains sea dye markers. If you are in a water survival situation, use sea dye markers during daylight to indicate your location. These spots of dye stay conspicuous for about 3 hours, except in very rough seas. Use them only if you are in a friendly area. Keep the markers wrapped until you are ready to use them. Use them only when you hear or sight an aircraft. Sea dye markers are also very effective on snow-covered ground; use them to write distress code letters.
Audio Signals
Radios, whistles, and gunshots are some of the methods you can use to signal your presence to rescuers.Radio Equipment
The AN/PRC-90 survival radio is a part of the Army aviator's survival vest. The AN/PRC-112 will eventually replace the AN/PRC-90. Both radios can transmit either tone or voice. Any other type of Army radio can do the same. The ranges of the different radios vary depending on the altitude of the receiving aircraft, terrain, vegetation density, weather, battery strength, type of radio, and interference. To obtain maximum performance from radios, use the following procedures:
- Try to transmit only in clear, unobstructed terrain. Since radios are line-of-sight communications devices, any terrain between the radio and the receiver will block the signal.
- Keep the antenna at right angles to the rescuing aircraft. There is no signal from the tip of the antenna.
- If the radio has tone capability, place it upright on a flat, elevated surface so that you can perform other survival tasks.
- Never let the antenna touch your clothing, body, foliage, or the ground. Such contact greatly reduces the range of the signal.
- Conserve battery power. Turn the radio off when you are not using it. Do not transmit or receive constantly. In hostile territory, keep transmissions short to avoid enemy radio direction finding.
- In cold weather, keep the battery inside your clothing when not using the radio. Cold quickly drains the battery's power. Do not expose the battery to extreme heat such as desert sun. High heat may cause the battery to explode. Try to keep the radio and battery as dry as possible, as water may destroy the circuitry.
Whistles provide an excellent way for close up signaling. In some documented cases, they have been heard up to 1.6 kilometers away. Manufactured whistles have more range than a human whistle.
Gunshots
In some situations you can use firearms for signaling. Three shots fired at distinct intervals usually indicate a distress signal. Do not use this technique in enemy territory. The enemy will surely come to investigate shots.
CODES AND SIGNALS
Now that you know how to let people know where you are, you need to know how to give them more information. It is easier to form one symbol than to spell out an entire message. Therefore, learn the codes and symbols that all aircraft pilots understand.SOS
You can use lights or flags to send an SOS--three dots, three dashes, three dots. The SOS is the internationally recognized distress signal in radio Morse code. A dot is a short, sharp pulse; a dash is a longer pulse. Keep repeating the signal. When using flags, hold flags on the left side for dashes and on the right side for dots.Ground-to-Air Emergency Code
This code (Figure 19-6) is actually five definite, meaningful symbols. Make these symbols a minimum of 1 meter wide and 6 meters long. If you make them larger, keep the same 1: 6 ratio. Ensure the signal contrasts greatly with the ground it is on. Place it in an open area easily spotted from the air.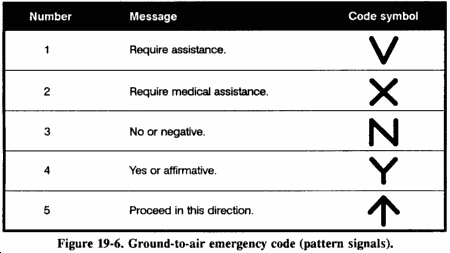
Body Signals
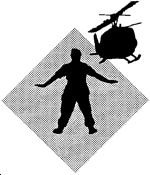
When an aircraft is close enough for the pilot to see you clearly, use body movements or positions (Figure 19-7) to convey a message.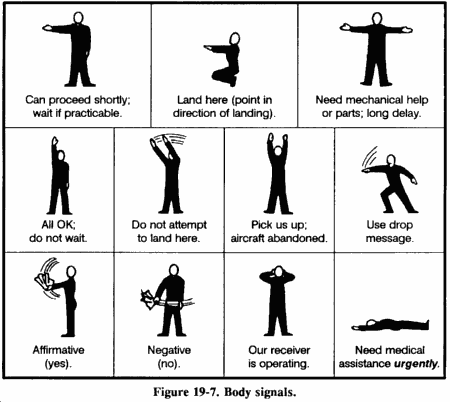
Panel Signals
If you have a life raft cover or sail, or a suitable substitute, use the symbols shown in Figure 19-8 to convey a message.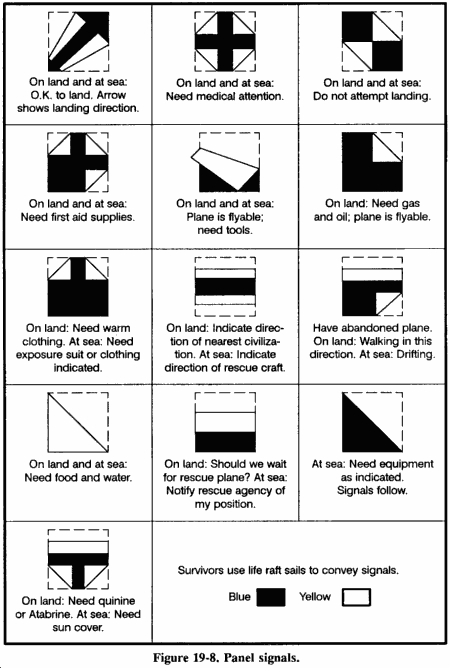
Aircraft Acknowledgments
Once the pilot of a fixed-wing aircraft has sighted you, he will normally indicate he has seen you by flying low, moving the plane, and flashing lights as shown inFigure 19-9. Be ready to relay other messages to the pilot once he acknowledges that he received and understood your first message. Use a radio, if possible, to relay further messages. If no radio is available, use the codes covered in the previous paragraphs.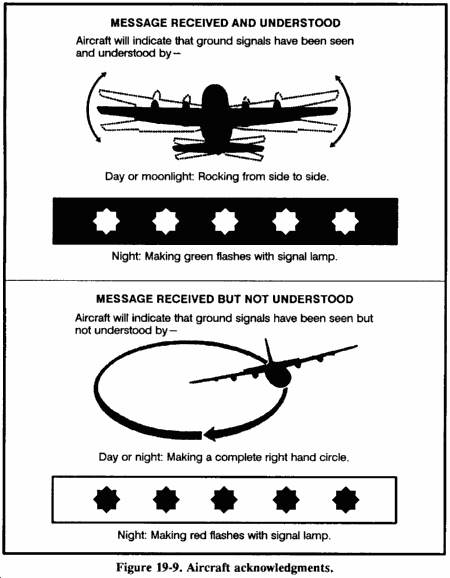
AIRCRAFT VECTORING PROCEDURES
If you can contact a friendly aircraft with a radio, guide the pilot to your location. Use the following general format to guide the pilot:- Mayday, Mayday.
- Call sign (if any).
- Name.
- Location.
- Number of survivors.
- Available landing sites.
- Any remarks such as medical aid or other specific types of help needed immediately.
No comments:
Post a Comment